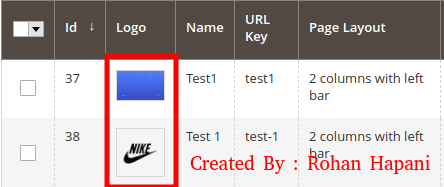
In this tutorial, Today I will explain to how to display an image in the admin UI grid in Magento 2. In Magento 2 UI Grid, Generally string data display in UI Grid. But, if you saved image in DB and you want to retrieve data from DB and need to display Image in UI grid then, how to display that image file?
We can display image in custom UI grid same as like product UI grid. For that, you need to follow some below steps and add code in the file.
Let’s follow below steps :
You may also like this :
- How to use inline edit in UI Grid in Magento 2
- Magento 2 : Create UI Component Grid and Form
- Add Category Filter to Product Grid in Magento 2 Admin
1) First of all, Let’s assume that you have created UI grid. If not, then you can follow above link for create UI Grid. Now, you need to add this below code in your UI grid listing file (For ex : rh_helloworld_listing.xml) at app/code/RH/Helloworld/view/adminhtml/ui_component/ file :
<column name="logo" class="RH\Helloworld\Ui\Component\Listing\Column\Logo">
    <argument name="data" xsi:type="array">
        <item name="config" xsi:type="array">
            <item name="component" xsi:type="string">Magento_Ui/js/grid/columns/thumbnail</item>
            <item name="label" xsi:type="string" translate="true">Logo</item>
            <item name="altField" xsi:type="string">title</item>
            <item name="has_preview" xsi:type="string">1</item>
            <item name="sortOrder" xsi:type="number">30</item>
        </item>
    </argument>
</column>
2) After that, You need to create Logo.php file at app/code/RH/Helloworld/Ui/Component/Listing/Column and paste the below code :
<?php
/**
 * Created By : Rohan Hapani
 */
namespace RH\Helloworld\Ui\Component\Listing\Column;

use Magento\Framework\View\Element\UiComponentFactory;
use Magento\Framework\View\Element\UiComponent\ContextInterface;
use Magento\Store\Model\StoreManagerInterface;
use Magento\Ui\Component\Listing\Columns\Column;

class Logo extends Column
{

    const ALT_FIELD = 'title';

    /**
     * @var \Magento\Store\Model\StoreManagerInterface
     */
    protected $storeManager;

    /**
     * @var \Magento\Catalog\Helper\Image
     */
    protected $imageHelper;

    /**
     * @param ContextInterface              $context
     * @param UiComponentFactory            $uiComponentFactory
     * @param StoreManagerInterface         $storeManager
     * @param \Magento\Catalog\Helper\Image $imageHelper
     * @param array                         $components
     * @param array                         $data
     */
    public function __construct(
        ContextInterface $context,
        UiComponentFactory $uiComponentFactory,
        StoreManagerInterface $storeManager,
        \Magento\Catalog\Helper\Image $imageHelper,
        array $components = [],
        array $data = []
    ) {
        $this->storeManager = $storeManager;
        $this->imageHelper = $imageHelper;
        parent::__construct($context, $uiComponentFactory, $components, $data);
    }

    /**
     * Prepare Data Source
     *
     * @param array $dataSource
     * @return array
     */
    public function prepareDataSource(array $dataSource)
    {
        if (isset($dataSource['data']['items'])) {
            $fieldName = $this->getData('name');
            foreach ($dataSource['data']['items'] as &$item) {
                $url = '';
                if (isset($item[$fieldName])) {
                    if ($item[$fieldName] != '') {
                        $url = $this->storeManager->getStore()->getBaseUrl(
                            \Magento\Framework\UrlInterface::URL_TYPE_MEDIA
                        ) . "rh/helloworld/image" . $item[$fieldName];
                    } else {
                        $url = $this->imageHelper->getDefaultPlaceholderUrl('small_image');
                    }
                } else {
                    $url = $this->imageHelper->getDefaultPlaceholderUrl('small_image');
                }
                $item[$fieldName . '_src'] = $url;
                $item[$fieldName . '_alt'] = $this->getAlt($item) ?: '';
                $item[$fieldName . '_orig_src'] = $url;
            }
        }
        return $dataSource;
    }

    protected function getAlt($row)
    {
        $altField = $this->getData('config/altField') ?: self::ALT_FIELD;
        return isset($row[$altField]) ? $row[$altField] : null;
    }
}
rh/helloworld/image = set your image directory path
Here, I added like if logo value not set in DB then, placeholder image will be display. Otherwise, DB image will be display which should be exist in {base_url}/pub/media/rh/helloworld/image/ folder.
That’s it !!!
Output :

I hope this blog is easy to understand about how to display an image in the admin UI grid in Magento 2. In case, I missed anything or need to add some information, always feel free to leave a comment in this blog, I’ll get back with proper solution.
Stay Safe and Stay Connected !!


