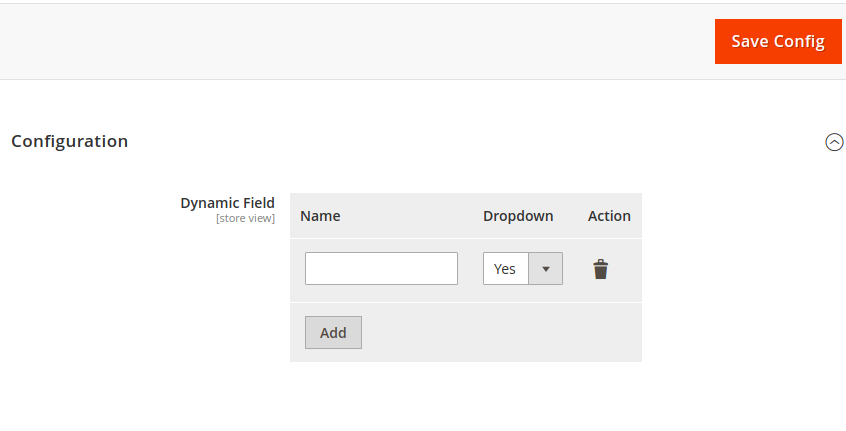
In this tutorial, I will explain you about how to add dynamic rows in system configuration in Magento 2. Dynamic rows is useful when need to save dynamic collection of records.
Whenever, we are developing any kind of module, we have to provide configuration to set value globally for site and operate anywhere in extension. Magento 2 provides many kind of UI components form fields. Among that, Dynamic rows is very important to store data as collection of records. It’s also provide functionality about add,delete and edit rows.
However, You can set many ui components field in dynamic rows like textbox, dropdown, multiselect etc.
So, For add dynamic rows, Let’s create an example of add dynamic rows in system configuration.
You may also like this :
- How to Get Store Config Value in Magento 2
- Magento 2 Get Config Value in Layout XML
- Magento 2 : Difference between obscure and password type
Steps of Dynamic Rows in System Configuration in Magento 2 :
1) First of all, Let’s assume that you have created simple module. Add this below code in your system.xml file add app/code/RH/Helloworld/etc/adminhtml/ :
<?xml version="1.0" encoding="UTF-8"?>
<!--
/**
 * Copyright © Magento, Inc. All rights reserved.
 * See COPYING.txt for license details.
 *
 * Created By : Rohan Hapani
 */
-->
<config xmlns:xsi="http://www.w3.org/2001/XMLSchema-instance" xsi:noNamespaceSchemaLocation="urn:magento:module:Magento_Config:etc/system_file.xsd">
   <system>
      <tab id="rhmodule" translate="label" sortOrder="50">
         <label>RH</label>
      </tab>
      <section id="section_extension" showInDefault="1">
         <tab>rhmodule</tab>
         <label>Helloworld</label>
         <resource>RH_Helloworld::config_extension</resource>
         <group id="general" translate="label" type="text" sortOrder="10" showInDefault="1" showInWebsite="1" showInStore="1">
            <label>Configuration</label>
            <field id="dynamic_field" translate="label" sortOrder="10" showInDefault="1" showInWebsite="1" showInStore="1">
               <label>Dynamic Field</label>
               <backend_model>RH\Helloworld\Block\Adminhtml\Config\Backend\ArraySerialized</backend_model>
               <frontend_model>RH\Helloworld\Block\Adminhtml\DynamicFieldData</frontend_model>
            </field>
         </group>
      </section>
   </system>
</config>
2) Secondly, Create ArraySerialized.php file to save value in serialize format at app/code/RH/Helloworld/Block/Adminhtml/Config/Backend/ and paste the below code :
<?php
/**
 * Created By : Rohan Hapani
 */
namespace RH\Helloworld\Block\Adminhtml\Config\Backend;

use Magento\Framework\App\Cache\TypeListInterface;
use Magento\Framework\App\Config\ScopeConfigInterface;
use Magento\Framework\App\Config\Value as ConfigValue;
use Magento\Framework\Data\Collection\AbstractDb;
use Magento\Framework\Model\Context;
use Magento\Framework\Model\ResourceModel\AbstractResource;
use Magento\Framework\Registry;
use Magento\Framework\Serialize\SerializerInterface;

class ArraySerialized extends ConfigValue
{

    protected $serializer;

    public function __construct(
        SerializerInterface $serializer,
        Context $context,
        Registry $registry,
        ScopeConfigInterface $config,
        TypeListInterface $cacheTypeList,
        AbstractResource $resource = null,
        AbstractDb $resourceCollection = null,
        array $data = []
    ) {
        $this->serializer = $serializer;
        parent::__construct($context, $registry, $config, $cacheTypeList, $resource, $resourceCollection, $data);
    }

    public function beforeSave()
    {
        $value = $this->getValue();
        unset($value['__empty']);
        $encodedValue = $this->serializer->serialize($value);
        $this->setValue($encodedValue);
    }

    protected function _afterLoad()
    {
        $value = $this->getValue();
        if ($value)
        {
            $decodedValue = $this->serializer->unserialize($value);
            $this->setValue($decodedValue);
        }
    }
}
3) After that, Create DynamicFieldData.php file for display data in admin at app/code/RH/Helloworld/Block/Adminhtml/ and paste the below code :
<?php
/**
 * Created By : Rohan Hapani
 */
namespace RH\Helloworld\Block\Adminhtml;

use Magento\Config\Block\System\Config\Form\Field\FieldArray\AbstractFieldArray;
use Magento\Framework\DataObject;
use RH\Helloworld\Block\Adminhtml\Form\Field\CustomColumn;

class DynamicFieldData extends AbstractFieldArray
{
    /**
     * @var CustomColumn
     */
    private $dropdownRenderer;

    /**
     * Prepare existing row data object
     *
     * @param DataObject $row
     * @throws LocalizedException
     */
    protected function _prepareToRender()
    {
        $this->addColumn(
            'attribute_name',
            [
                'label' => __('Attribute Name'),
                'class' => 'required-entry',
            ]
        );

        $this->addColumn(
            'dropdown_field',
            [
                'label' => __('Dropdown'),
                'renderer' => $this->getDropdownRenderer(),
            ]
        );

        $this->_addAfter = false;
        $this->_addButtonLabel = __('Add');
    }

    /**
     * @param DataObject $row
     */
    protected function _prepareArrayRow(DataObject $row)
    {
        $options = [];
        $dropdownField = $row->getDropdownField();

        if ($dropdownField !== null)
        {
            $options['option_' . $this->getDropdownRenderer()->calcOptionHash($dropdownField)] = 'selected="selected"';
        }

        $row->setData('option_extra_attrs', $options);
    }

    /**
     * @return CustomColumn
     * @throws LocalizedException
     */
    private function getDropdownRenderer()
    {
        if (!$this->dropdownRenderer)
        {
            $this->dropdownRenderer = $this->getLayout()->createBlock(
                CustomColumn::class,
                '',
                ['data' => ['is_render_to_js_template' => true]]);
        }
        return $this->dropdownRenderer;
    }
}
4) In Last, Create CustomColumn.php file for list item of dropdown in admin at app/code/RH/Helloworld/Block/Adminhtml/Form/Field/ and paste the below code.
<?php
/**
 * Created By : Rohan Hapani
 */
namespace RH\Helloworld\Block\Adminhtml\Form\Field;

use Magento\Framework\View\Element\Html\Select;

class CustomColumn extends Select
{
    /**
     * Set "name" for <select> element
     *
     * @param string $value
     * @return $this
     */
    public function setInputName($value)
    {
        return $this->setName($value);
    }

    /**
     * Set "id" for <select> element
     *
     * @param $value
     * @return $this
     */
    public function setInputId($value)
    {
        return $this->setId($value);
    }

    /**
     * Render block HTML
     *
     * @return string
     */
    public function _toHtml()
    {
        if (!$this->getOptions())
        {
            $this->setOptions($this->getSourceOptions());
        }

        return parent::_toHtml();
    }

    private function getSourceOptions()
    {
        return [
            ['label' => 'Yes','value' => '1'],
            ['label' => 'No','value' => '0'],
        ];
    }
}
In addition, we also include dropdown field in dynamic rows in system configuration. You can save dropdown value using this example.
That’s it !!!
Now, Just clean cache and check it in your admin panel.
Output :

I hope this blog will helpful for easily understand how to add dynamic rows in system configuration in Magento 2. In case, I missed anything or need to add some information, always feel free to leave a comment in this blog, I’ll get back with proper solution.
Keep liking and sharing


